Installation Guide
Guide
TOOLS
- Pencil
- Notched trowel 6 mm
- Construction level
- Construction knife
- Pressure roller 60 mm
- Construction grater
- Spatula for grouting (trowel) 8 and 10 mm
- Building hair dryer
- Mixer and mixing containers
- Sponge, towel and water to clean tiles

PREPARATION OF THE BASE FOR TILE APPLICATION
It is important to mount facade systems on a flexible base on a completely flat, clean and dry surface.
When facing external walls, tiles can be attached both to the capital support and on walls made of heat-insulating materials:
Mineral wool, foam plastic, polystyrene foam – at least a day before the installation of tiles, the surface is reinforced using a facade mesh. For the reinforcing layer, it is necessary to use only specially designed construction mixtures and alkali-resistant mesh for these materials, and follow the instructions for their application. Before installing the tiles, the surface is primed.
Brick, concrete, plaster, foam and aerated concrete, plasterboard:
Aerated concrete walls must be carefully protected with an appropriate external plaster. Concrete walls must stand for at least 6 months before facing and be sandblasted.
The base is cleaned of dust, spills, oil stains and other substances that reduce adhesion, and is covered with a universal deep penetration primer. All protruding parts are removed (small irregularities can be leveled with tile glue), the walls are leveled with putty and treated with a primer for the appropriate material. After priming, wait the time period indicated in the instructions for the primer for complete drying and film formation, at least 4 hours. There is no need for mesh reinforcement.
PREPARATION OF ADHESIVE MIXTURE FOR TILE MOUNTING
After preparing the work surface, an adhesive mixture is prepared from tile adhesive. Choose frost-resistant glue for outdoor work from manufacturers in your region. Before starting work, carefully study the instructions for using the adhesive and consult with the tile manufacturer.
The procedure for mixing the adhesive mixture with a mixer: add water, pour 2/3 of the bag into the container, mix at low speeds up to 1000 rpm (perforator revolutions), after the mixture is completely moistened, add the remaining dry mixture of 1/3 of the bag, mix until the mass of the solution is homogeneous. Leave for at least 5 minutes before use and stir again for 1-2 minutes. The consistency of the finished solution should be plastic and viscous, held on an inverted spatula (the recommended amount of water is 6-7 liters, depending on weather conditions).
The time of using the shutter mixture is 60 minutes, the time for adjustment is 30 minutes.
Note: The life of the adhesive mortar may vary depending on the water temperature, dry mix temperature and ambient air temperature. Note the slowing growth of the strength of the mortar at curing temperatures below +15 °C. Fresh joints should be protected from too rapid drying and protected for at least 5-7 days (at 20°C and relative humidity of 60%) from adverse weather conditions (scorching sun, rain, strong wind, frost, etc.). if necessary cover with a film, providing ventilation.
To finish the joints, use a grout of the desired color from manufacturers in your area. Before choosing a grout, read the paragraph “How to grout joints”.
BRICK SLIPS LAYING TECHNIQUE BY PIECE
1. Brick slips is installed on a flat surface. It is installed in the traditional way of laying clinker tiles. Flexible bricks can be cut with a construction knife.
2. On the back side of the tile, apply tile adhesive for facade work and spread with a 6 mm notched trowel. This method is very convenient, as the marking on the wall remains visible.
3. Treat the upper right corner with corner elements and start installing the tiles, following the markings. To avoid voids under the tile, slightly press the brick into the glue with an offset.
When laying tiles in several colors, use a color scheme layouts from the manufacturer. You can independently select different color solutions to your taste.
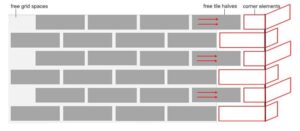
TECHNOLOGY OF MOUNTING MODULES
First, glue the corner elements on the top right corner, and then start gluing modules.
On the right side of the module are the tile halves that protrude beyond the fiberglass mesh. On the left side of the module left space for the half tiles of the next module. The grid is trimmed flush at the top of the module and a surplus of grid is left at the bottom to overlap.
Apply glue to the wall within the markings on 1 m² of the marked area and “comb” in a horizontal direction with a 6 mm notched spatula.
Attach the module on the right side, inserting the tile halves into the gaps between the corner pieces. Use a trowel to remove the adhesive from the gaps in the fiberglass mesh on the left side of the module and reapply the adhesive to those areas of the mesh to better bond with the tile halves from the next module.
Assemble the modules like puzzles: so that the free halves of the tiles fit into the free spaces of the grid on the left. Watch the seams. Align the modules and, if necessary, make an incision with a knife.
Press the modules against the wall surface to remove air bubbles under the tiles. Remove excess glue on the seams with a trowel.
After the adhesive dries, proceed to grouting the joints. Attention: When installing tiles in a seamless manner It is necessary to roll it with a plastic roller with a diameter of 50 mm until the glue shows in the gaps between the tiles.
If the tile is not protected by a film, installation work should be carried out carefully. Clean the tile until the glue dries. Use a damp sponge and a dry, clean towel.
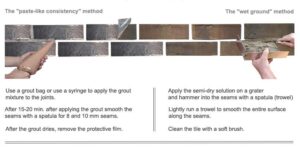
METHODS OF GROUTING SEAMS
When applying a paste-like grout, choose a tile with a protective film. Semi-dry grouting with a mixture “wet earth” does not stain the tiles and is easy to clean after drying.
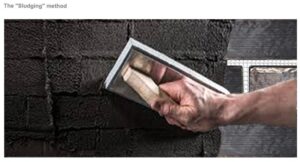
The fastest way to grout seams is the “Sludging method”. It is used for this tiles with a protective film.
The grout is rubbed with a grater on the surface of the tile, filling the seams. After the grout dries, remove the film, the tile remains clean.
Choose a frost-resistant grout with water-repellent properties for exterior work, from a local manufacturer.
Before processing the seams, read the manufacturer’s instructions.
Pay attention to the brand of grout by the thickness of the seams.
You can start grouting the joints no earlier than 24 hours after installing the tiles. The temperature of the working surface is from + 5 to + 25 °C. Before grouting, carefully remove all remnants of tile adhesive from the seams. A knife, file, narrow spatula or other tool is used for this.
ATTENTION: If the temperature conditions (+ 5°C + 25°C) and sudden temperature changes are not observed, a whitish deposit may form on the grout. Such deposits in no case can be removed with solvents based on acids. To remedy the situation, you need to wait for stable weather and grout the joint on top, using grout diluted to a thick paint.
ASSEMBLY FEATURES
Brick slips must be installed at an average daily temperature of at least +5°C and no higher than 25°C.
During the summer, use netting, awnings, etc. to prevent direct sunlight and reduce ventilation. At average daily temperatures below + 5 ° C for exterior work, use awnings closed and tents (around the clock until the adhesive and grout is completely dry) to prevent precipitation on the facing surface and the formation of lime deposits on the joints.
- Do not add any additives into the glue solution!
- Do not dilute cured adhesive and grout with water!
At temperatures below +18°C the flexibility of flexible tiles decreases and they may break when bent. It is recommended that the tiles be heated with a construction hair dryer before use.
In unstable weather conditions, the adhesive application area is adjusted downwards and the curing rate of the adhesive is increased.
Adjustment of tile placement is possible within 20 minutes after installation on the adhesive base.
The method of processing corners by bending individual tiles or tiles on modules no thicker than 3 mm, at a temperature of +25 ° C and the use of a construction hair dryer for additional heating of both sides of the tiles to 60-80 ° C is allowed.
This method of processing corners requires skill. The glue under the tile cools its surface, there is a risk of microcracks when stretching the sharply cooled surface of the tiles in the bend. To fix these defects, you should use a repair compound in the color of the tile, rubbing it into the cracks in a circular motion with a sponge. This method of treatment ensures that the mixture evenly fills the textured surface of the tile. Any remaining grit should be brushed off immediately.
Before installing tiles by bending them into a corner, the sharp corners should be cleaned beforehand. The corner bending method gives the effect of 90° rounded corners.
Tiles with complex textures and colors as well as tiles over 3 mm thick should be installed on the corners by splicing corner constructors or using prefabricated corner elements.
There are various tile protection options to choose from:
Protective film – the tile surface is coated with a film during production, which is removed after tile installation and grouting of the joints.
Lacquer – the surface of tiles during the production process is coated with a protective varnish that has water-repellent properties. In this case, contamination must be removed from the tile before the adhesive and grout dries.
Additional coating of tiles with varnish or hydrophobic primers is not required.
Attention, it is strictly forbidden to use cleaners based on acids and alkalis to clean the tiles from dirt or to clean the seams from salt deposits!
When using the materials described in this manual under conditions not mentioned, please consult the manufacturer.
SAFETY REQUIREMENTS
Do not eat, drink or smoke while handling these products. When using, follow the manufacturer’s instructions.
Tile adhesive and grout are cement-based, so use skin and eye protection when working with them. If the glue gets into your eyes, immediately wash them with water and consult a doctor.